Crypto Bone Software Installation
Crypto Bone ALL-IN-ONE
Before you are thinking about an external Crypto Bone on a second Linux computer, please make sure that you have a running "cryptobone2" GUI program on your main Linux computer. All you need to do is to install one of the comprehensive software packages on your local Linux computer. See the download page for full information about the available packages.
When you run the GUI "cryptobone2" for the first time after installation, you are asked for the login name of the user that should be allowed to use the Crypto Bone, because this user must be able to contact the cryptobone daemon as root. While using the GUI you'll be asked for your login password from time to time, because your GUI will access the cryptobone daemon as root via the sudo mechanism.
If you don't want to use an external device, that's all you need to install. Type "cryptobone2" in a terminal window and enter your login password on request. Now you're ready for secure communications after you have registered your own safewebdrop address with a server.
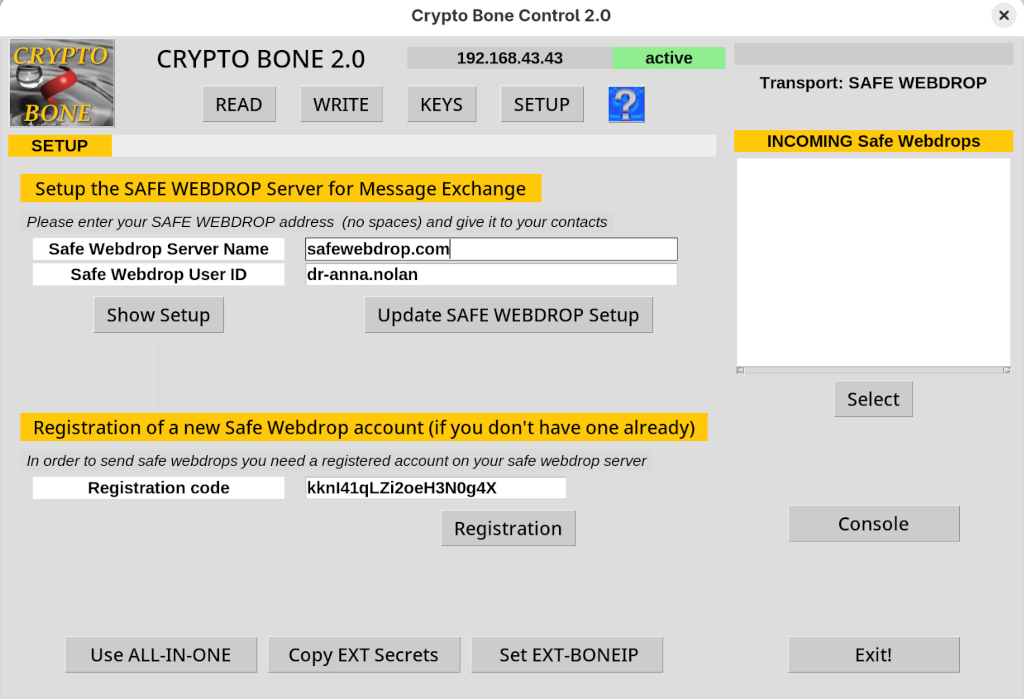
There is one step left of course before you can send out your first message and attachment to your contact. You need to enter the first, initial secret that you and your contact have agreed on during a personal meeting. Once you have entered the initinal secret for Paul, you'll forget about message keys entirely, because the encryption keys will change with every message you receive automatically.
ANYTHING Can Be An External Device
When I first invented the Crypto Bone ten years ago, I used a Beagle Bone computer board as the external device. That's where the name Crypto Bone came from.
But today, there are so many devices that can be used to host the encrypted data base of AES message keys, a Raspberry Pi 3, some old laptop or unused desktop or even a virtual machine in someone's basement or data center.
There is no longer a need for pre-fabricated SD cards, because any network connected computer with a 64 bit CPU can install the CryptoBone software provided in one of the Fedora, Centos/EL or Ubuntu packages from the download page.
People at Fedora are currently working on a complete installation on RISC64 platforms, so that the CryptoBone will be running on those boards too, in the near future.
The Second, Dedicated Linux Computer
I assume that whatever device you are going to use as the external Crypto Bone, you will have a means to log into this device using ssh as root. And I assume that your external device has a permanent IP address on the network. (ie 192.168.43.43)
ssh -l root 192.168.43.34In the GUI you can register this IP address in the SETUP section.
The external Crypto Bone software is not enabled after installation on your external device, because it should only be run on a dedicated, second Linux machine. To activate the external software part (via the ssh shell) you can run the command "external-cryptobone", that helps you to set up the external device.
You can also use a GUI "external-cryptobone-admin" for the admininstration, if you sit in front of the external device with a monitor and keyboard attached.
But be aware of the fact, that activating the external software can isolate the separate Linux computer, so that it will no longer be usable for internet browsing due to its restrictive firewall setting. But after all, this is not what you want to use it for, do you?
And don't activate the external software part on your main computer, as the ALL-IN-ONE Crypto Bone daemon is active there already. On the client machine, where the cryptobone2 GUI is running, the "normal" cryptobone daemon will still be needed.
Some Background Information Before You Start
The Cryptobone software comprises of two separate parts, the ALL-IN-ONE software and the EXTERNAL software.
The EXTERNAL software is located entirely in this directory /usr/lib/cryptobone/ext. If this machine is meant to function as an external device, the daemon cryptoboneexternd will be run on this machine instead of the "normal" daemon cryptoboned, that is running on the other machine (the client) which provides the GUI "cryptobone2".
To enable the EXTERNAL software on this machine you'd run the following command (as root):
ssh -l root 192.168.43.34
/bin/external-cryptobone enableThis command will not only start the external cryptobone daemon, it will also make sure that the file /usr/lib/cryptobone/safewebdrop.header is set correctly, so that ${CBHOME} is set to the directory /usr/lib/cryptobone/ext and the ramdisk is /dev/shm/EXRAM on this external machine.
As a result the daemon "cryptoboneexternd" will be started via the script /usr/lib/cryptobone/ext/init.d/cryptoboneexternd by a systemd script.
When the external daemon is started for the first time there is no data base file and no master key to encrypt it. There is also no user "cryptobone" that can provide a ssh tunnel to this machine and no ssh private and public key for this user.
To produce all these secrets is the purpose of the script /usr/lib/cryptobone/ext/initialkeysetup. (see comments for details)
The external daemon is now stuck in a loop waiting for the master key to be sent from the client machine, the one that runs the GUI. But to be able to sent the master key from the client machine, all secrets that have been stored in the ramdisk /dev/shm/BOOT on the external device must manually be transferred to the client machine into a directory /dev/shm/BOOT. Once the secrets (masterkey, ssh private key and local key) have been transferred to the client machine, the GUI can request a copy into the client's data base.
After the next reboot of the client machine the master key will be uploaded to the external device and the external daemon creates the (encrypted) data base and goes into active mode. No reboot of the external machine is necessary.
As long as the external device is running, the cleartext messages and attachment files are located in the ramdisk /dev/shm/EXRAM exclusively and the GUI on the client machine can request everything from the external device through the ssh tunnel in the same way as it would directly query its own daemon on the client machine while operating in ALL-IN-ONE mode.
Transferring The External Secrets Using The GUI
The process of transferring the three secrets from the external device to the client machine will now be explained:
When you enable the external Crypto Bone software with:
ssh -l root 192.168.43.34
/bin/external-cryptobone enableThe script /usr/lib/cryptobone/ext/initialkeysetup generates three pieces of secret information that are stored in the RAMDISK /dev/shm/BOOT on the external device. These secrets are needed to establish a secure connection between a client machine (in EXTERNAL mode) and an external device.
In order to use these secrets on the client machine with the GUI, these secrets must be transferred to the client machine and stored in a RAMDISK of the same name.
Let's assume you have a ssh shell to the external device as root. When "initialkeysetup" has finished, you'll find the secrets in /dev/shm/BOOT on the external device.
Now, log into your client device (as the ordinary user) and do the following to transfer the secets:
cd /dev/shm; mkdir BOOT; cd BOOT
scp root@192.168.43.43:/dev/shm/BOOT/secrets.tgz .
tar xvpzf secrets.tgz
ls -lPlease make sure that the BOOT directory and its files are readable by the GUI under the user's UID.
Start the GUI and press the "Copy EXT Secrets" button (in SETUP) in order to save the secrets in the client's encrypted data base. Delete the directory /dev/shm/BOOT on the client machine and reboot your computer.
During the next boot process of your client machine the master key is being uploaded to your external device to the external daemon that is waiting for the master key all the time. Once the master key reaches the external device for the first time, the daemon will decrypt its encrypted data base and will go into "active" mode. The external device is now operational.
Note that the masterkey is never stored on the external device. The external data base can only be decrypted when the masterkey arrives via the secure ssh tunnel from the client machine.
That is all you need to prepare any external device to operate as an External Crypto Bone. Everything else is done while using the GUI on you main computer.